
Directional TOPO Cloning

Introduction
Directional topo cloning or D-TOPO cloning is a simple cloning method to clone PCR amplified products in the correct orientation directly. Directional TOPO cloning is restriction enzyme-free and ligation-free cloning. The use of DNA ligase in the ligation step was skipped in TOPO cloning using the topoisomerase enzyme.
In 1987 Shuman and Moss identified the DNA topoisomerase 1 from the vaccinia virus. The topoisomerase relaxes the super-coiled DNA by unwinding or winding duplex DNA by cutting and rejoining during replication and transcription.
The topoisomerase 1 from the Vaccinia virus recognizes the pentapyrimidine element C/TCCTT sequence and cuts the DNA (Shuman et al. 1991, 1992). The ability of the topoisomerase enzyme to recognize specific DNA sequences, cutting within the recognition sequence, and re-joining was utilized in TOPO cloning.
In the cleavage reaction, topoisomerase is attached to the 3’end by forming a covalent bond between cleaved 3′ DNA strands to a tyrosine residue (Tyr274) of topoisomerase. The energy stored in this phospho-tyrosyl bond between the DNA and enzyme is utilized to re-ligate the ends that originally cleaved or re-ligate to a heterologous acceptor DNA (Insert). The enzyme gets released from vector ends after rejoining the ends. In 1994 Shuman used this topoisomerase 1 from the vaccinia virus enzyme to make recombinant plasmid.
Only the proofreading DNA polymerase (3’ to 5’ exonuclease activity) should be used to generate blunt-end PCR products. To know more about generating blunt end insert, please ref this article. A non-proofreading polymerase like Taq DNA pol does not generate blunt end products.
Principle
In The Directional TOPO cloning, the insert is amplified using a forward primer that contains an additional CACC sequence at the 5’ end. The CACC sequence in the insert base pair with vector overhang GTGG sequence. During this stable association, the topoisomerase enzyme seals the joints of the vector and insert, resulting in the directional insertion of the insert.
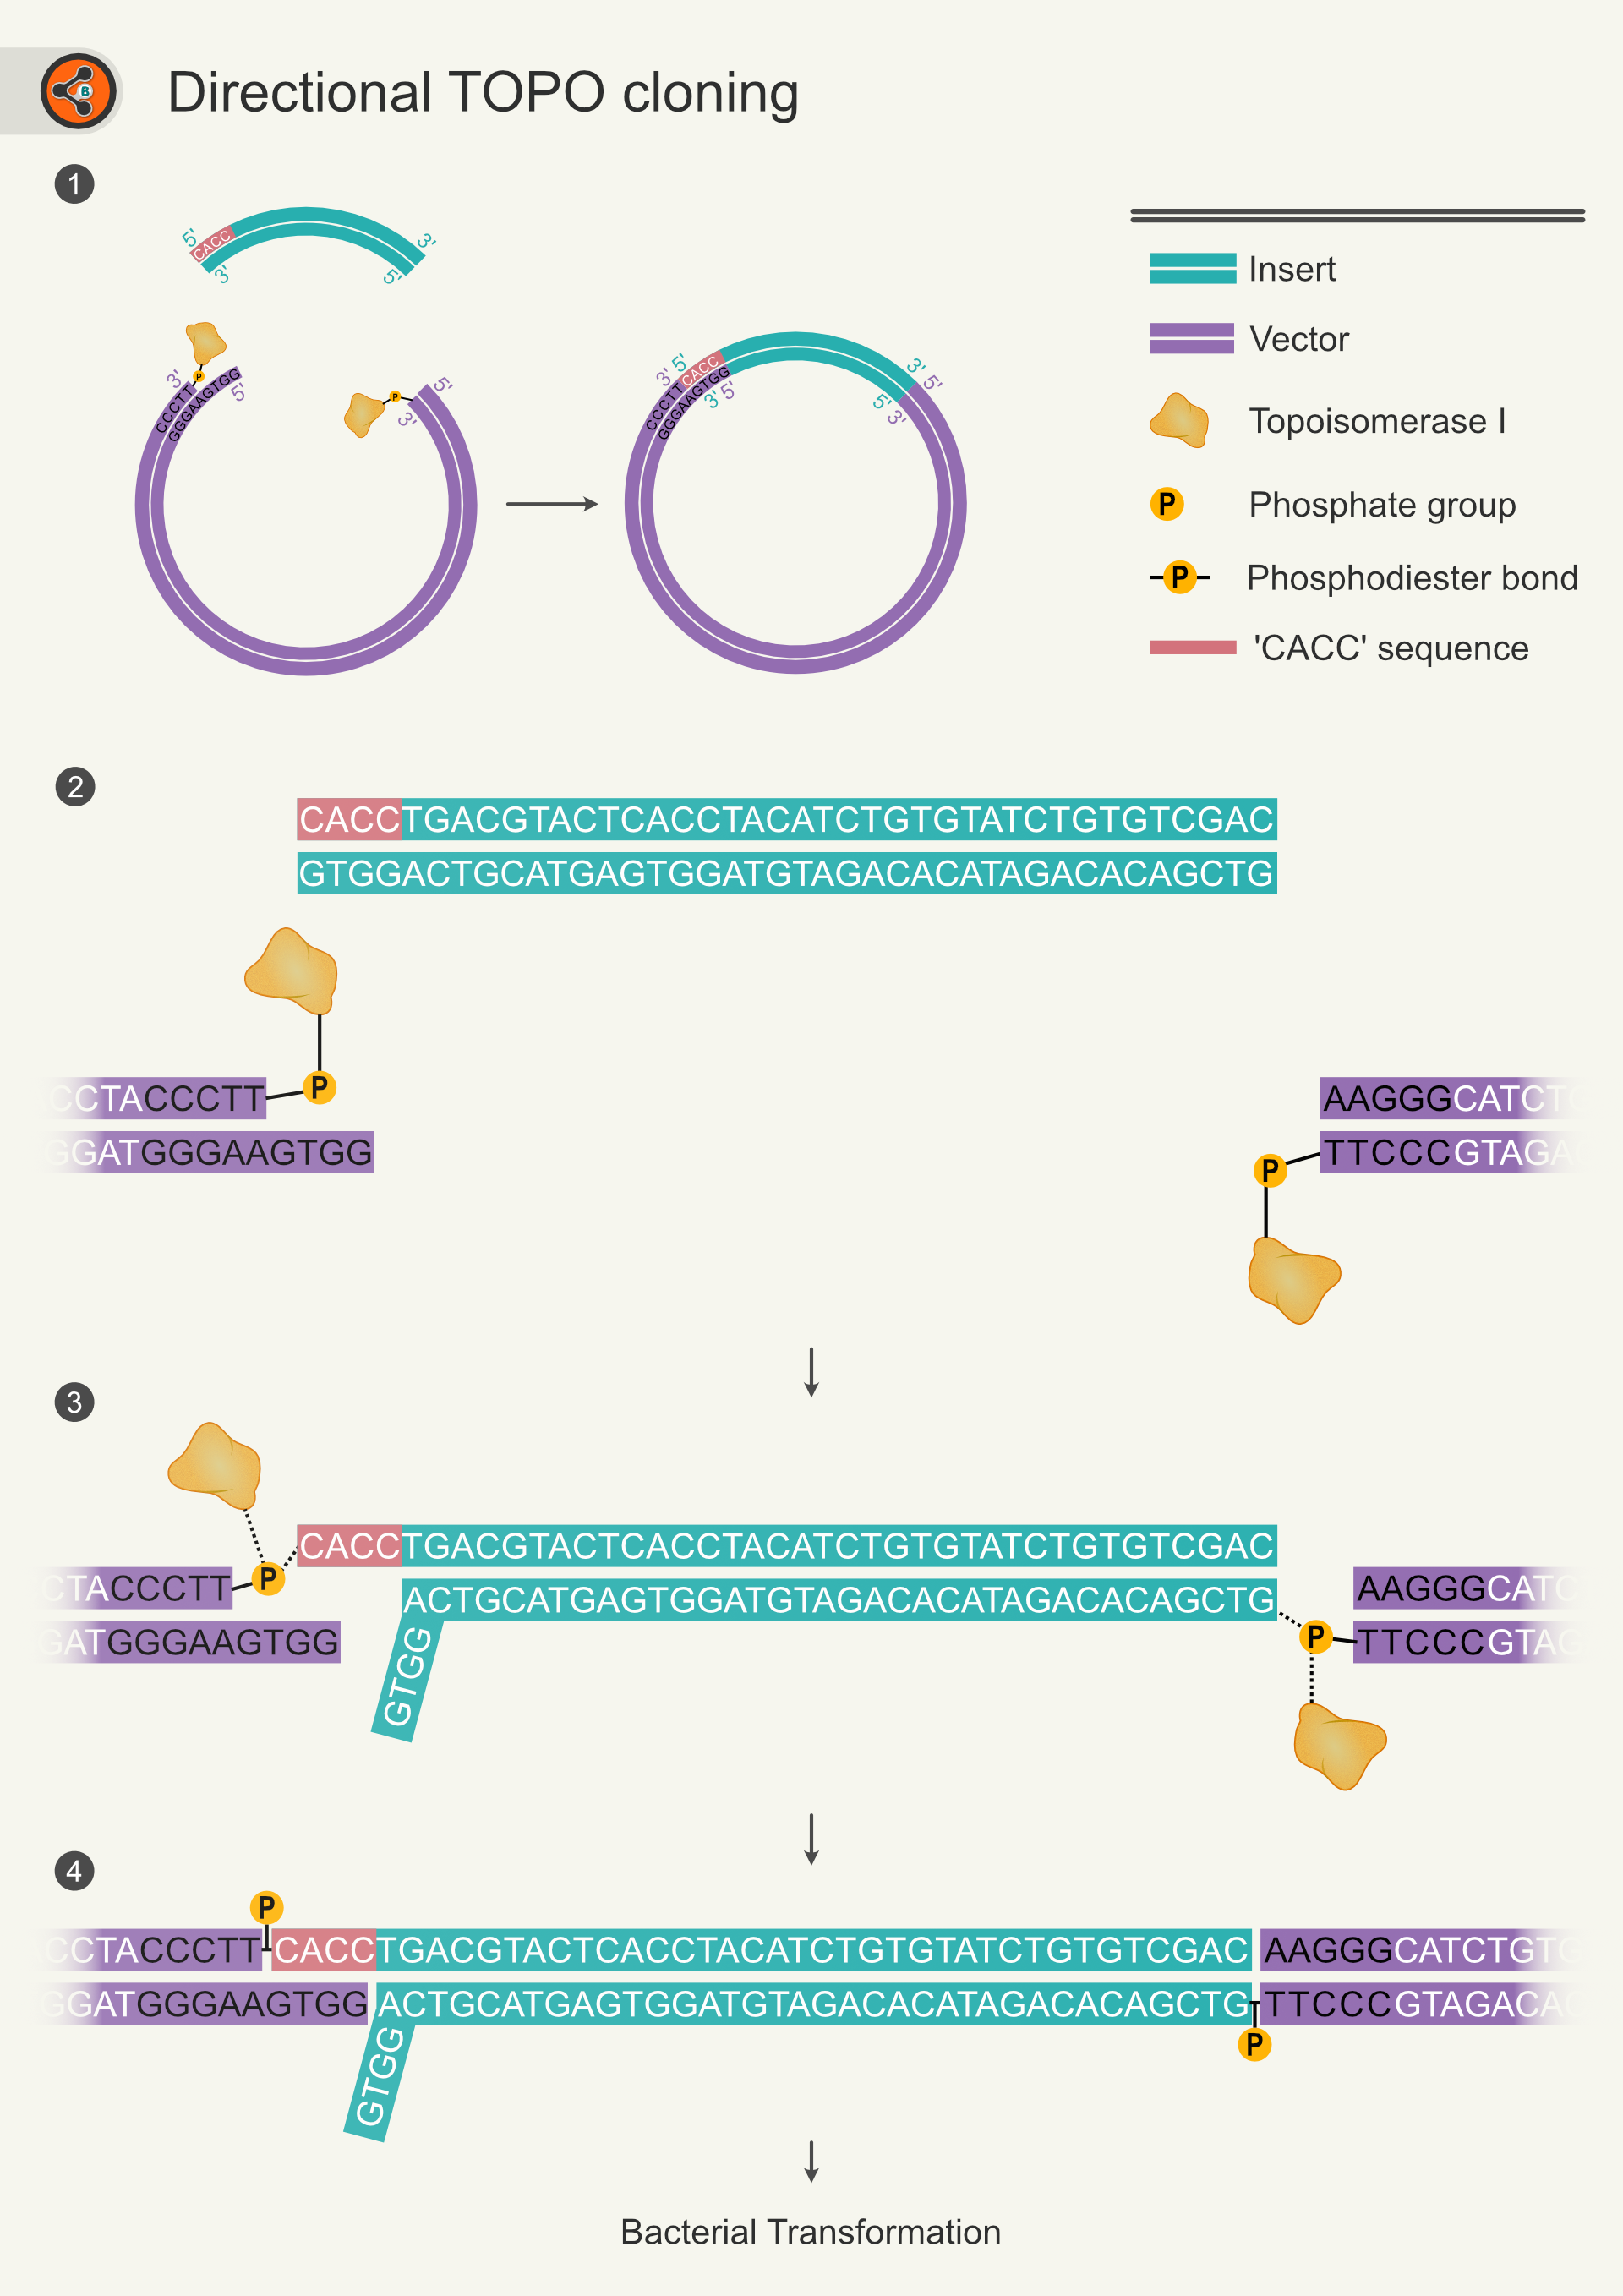
Figure 1. Schematic diagram representing steps in directional TOPO cloning. 1.1 An overview of directional TOPO cloning. Insert (teal) is ligated with vector (violet) resulting in recombinant vector (final product). 1.2-1.4 Shows the steps involved in the ligation during topo cloning. 1.2 The insert contains a 5′ CACC additional sequence to facilitate directional cloning. The CACC sequence of the insert joins perfectly with vector DNA’s GTGG overhang at one of the vector ends. The topoisomerase I is attached to 3′ T (shown in bold) of the CCCTT sequence is present at both ends. 1.3 The 5′ OH of inset grabs phosphate group of topoisomerase I via nucleophilic substitution and replaces topoisomerase I with itself. 1.4 After successful TOPO reaction, insert attached with the vector backbone with two phosphodiester bonds in total. This arrangement leaves two nicks and a GTGG overhang sequence which would be sealed and repaired in the bacteria after transformation.
Advantages
- Directional cloning generates 100% inserts in the proper orientation.
- It is easy to use and simple cloning technique
- Restriction-free and ligation-free cloning are generally used for subcloning.
Limitations
- We need to buy the TOPO vectors of our choice; generating vectors in the lab will be challenging.
- The forward primer contains an extra CACC sequence at the 5’ end.
Procedure – an overview
Directional TOPO cloning involves the following steps.
- Preparation of Insert
- Selection of vector
- TOPO cloning reaction
- Transformation
- Selection of transformants and other downstream processes.
Let us see the first three steps.
Preparation of Insert
Primer design
Directional TOPO cloning forward primers require special sequences (CACC) at the 5′ of the primer. The reverse primer does not require any special sequences at the 5’ end. A detailed demonstration of primer designing is mentioned here.
Blunt end Insert preparation
The presence of overhangs (not to be confused with CACC which is duplex DNA) interferes with cloning. So it is important to have a blunt-end insert for successful cloning. The insert can be prepared by following two methods
- The PCR products amplified using the Proofreading polymerase (Pfu, Phusion, and Q5 polymerases) with 3’to 5’ exonuclease activity generate blunt end products.
- If the PCR product is amplified using non-proofreading polymerase (Example Taq DNA polymerase), generates PCR products with 3’ A. This PCR product can be incubated with the proofreading enzyme to remove the extra A overhang. (PCR Polishing).
For a more detailed discussion on blunt-end fragment generation, please refer to blunt-end cloning.
Vector
The vector needs to be purchased from the vendor. Vectors are available with different feature sets that aids in downstream processes. Please choose a suitable vector as per your needs.
TOPO Reaction
Mix the PCR amplified fragment with the D TOPO reaction mixture, which contains the D TOPO vector, and incubate at 25°C for 15 mins.
Transformation
Detailed protocol for transformation is discussed here.