
Primer Designing – Demonstration step by step

Introduction
This article demonstrates how to design primers (forward and reverse) for different types of cloning methods.
The primer design is demonstrated using Dsup (Damage Suppressor) gene from tardigrade (water bear). Tardigrades are fascinating animals with extraordinary abilities to cope with extreme conditions like the vacuum of space, high tolerance for UV radiation, high and low-temperature tolerance to begin with. Dsup protein is a newly discovered gene that imparts resistance to UV radiation by coating itself to DNA.
To amplify any DNA sequence, two primers are necessary. One is called ‘forward primer’ and the other one is called ‘reverse primer’. The forward primer synthesizes the upper strand using the bottom strand as a template. Whereas Reverse primer uses the upper strand as a template and synthesizes the lower strand.
Although the names suggest they create copies of different strands, their names depend on the direction of the strand being used for amplification.
The forward primer creates copies of the 5’-3’ strand whereas the reverse primer makes copies of the complementary (runs 3’-5’) strand.
In case, if you take the complementary sequence and use it for primer designing (laying the sequence in 5’-3’), the reverse primer in the above example now acts as the forward primer.
The following content focuses on demonstrating designing primers for different cloning methods. To follow along, access the sequence of Dsup from this link.
We are using APE (A Plasmid Editor) software to design the primers, which is free to use. You can download a copy from this link.
The primer design steps remain the same even if you use a different tool.
Designing forward primer
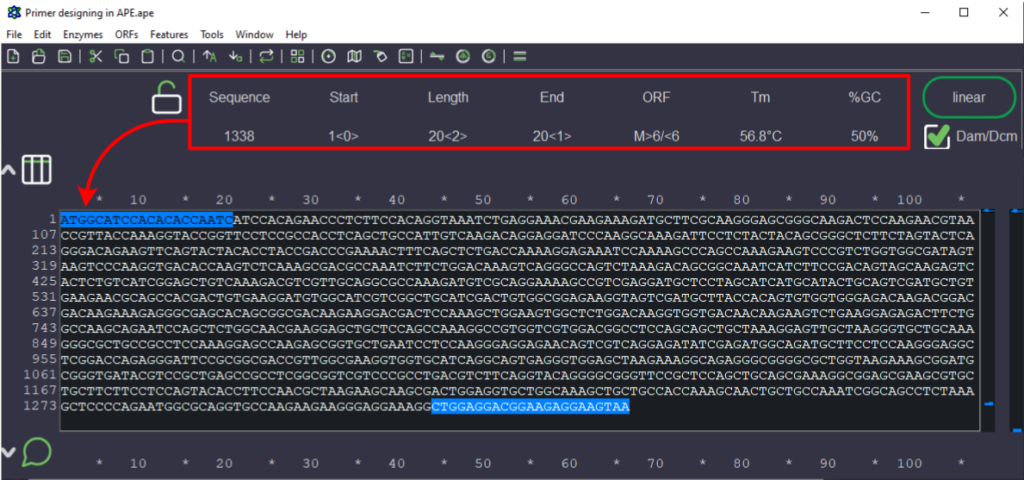
Figure 1. Sequence selected for designing forward primer (text highlighted in blue that is pointed by arrowhead). The red box indicates the parameters of the selected sequence like Tm, length of the sequence, and GC%.
Following are the steps involved in designing forward primer:
- We copied the Dsup gene nucleotide sequence from the NCBI portal (mentioned above) and pasted it in the APE tool. It starts from the start codon (ATG) and ends with the stop codon (TAA). The sequence of the gene is from 5’ to 3’ direction. Please note that only one strand of the DNA is represented here. Some of the tools like snapgene will show both the strands.
- The forward primer is designed by selecting the nucleotide sequence from ATG until the primer parameters like GC-content and Tm (melting temperature) match to primer designing parameters.
You can observe several parameters of the selected sequence from the header section of the tools (red box). The parameters are updated in live, so you can select or deselect the nucleotides to match the required criteria.
For most cases, the preferable Tm is between 55-62°C, and the GC content is 40-60%.
- In the example mentioned above, the primer length is 20 nucleotides long, Tm is 56.8°C (~57°C), and the GC content is 50%. So, this sequence can work as a forward primer. Also, the sequence ends with ‘C’ which is beneficial as it wobbles less while polymerase works on extending the primer.
- As the sequence is from 5’ to 3’ direction, the forward primer can be directly ordered. So the forward primer sequence to order is “ATGGCATCCACACACCAATC”.
- Please note that we are not mentioning it is as 5’- ATGGCATCCACACACCAATC-3’. It is a rule that the DNA sequences to be mentioned in 5’-3’ while the protein sequences to be mentioned from the N-C terminal.
- The below illustration (Fig 2) gives a good idea of how the forward primer is designed and how it gets utilized in the PCR reaction.
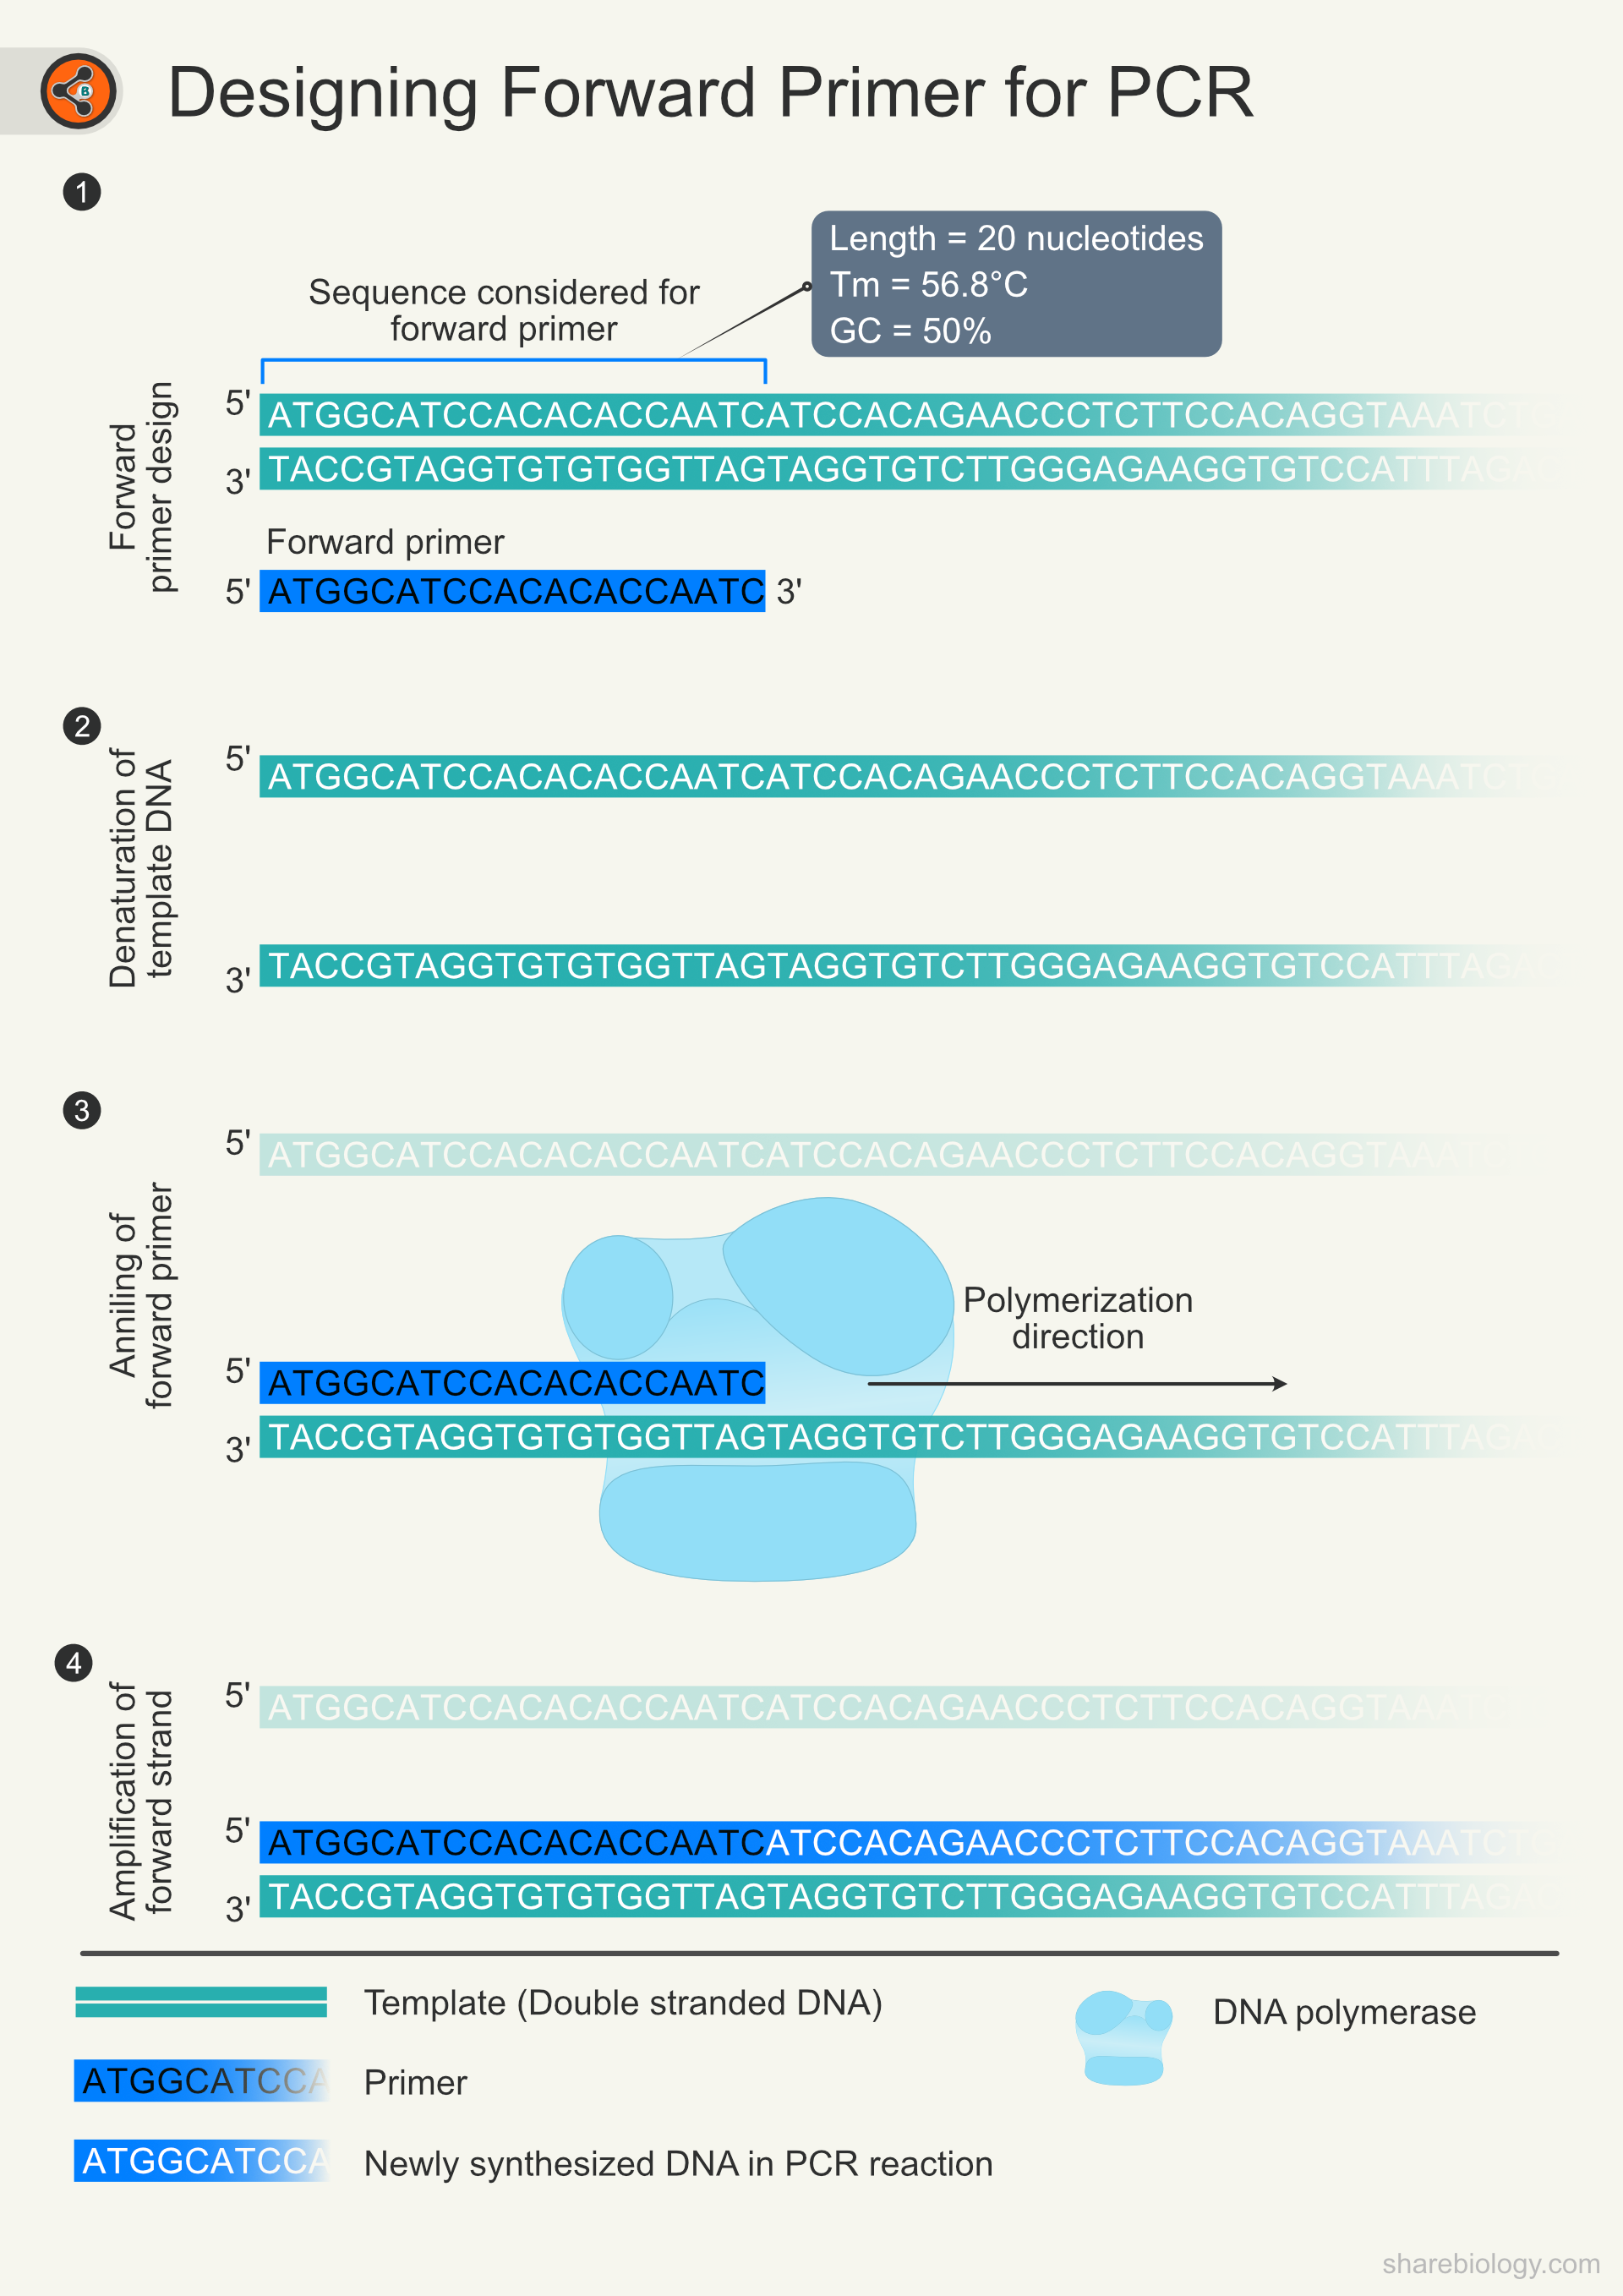
Figure 2. Illustration depicting the design of forward primer and its involvement in PCR. 2.1 The DNA double helix is shown in teal color. The sequence covered in blue open rectangle is used for reverse primer. Blue ribbon indicates primer. 2.2 DNA duplex unwinds in PCR reaction. 2.3 Binding of primer to the complementary strand. 2.4 Extension of primer creating upper strand (5’-3’).
Designing reverse primer
Designing the reverse primer is a bit tricky process. Partly the problem comes from the fact that that way we communicate DNA sequences. The other half of the problem is that we have to work with the template strand to design a primer for the other strand.
Whatever the issues are, with the help of tools like APE, designing the reverse primer is just a click of a button away. Follow the steps mentioned below to get the reverse primer sequence.
1. The reverse primer was designed from the end of the sequence that we have added to APE.
2. One critical point to keep in mind is that, whether to include the stop codon or not in the primer. This criterion depends on the downstream workflow. For example, if you want to add a tag (fluorescent protein or a short peptide etc.) to the C terminal of the protein, you need to remove the stop codon from the reverse primer to let the tag be fused during translation. If your goal is to sub-clone the gene or to express the protein without tags at the C-terminal of the gene, you will have to include the stop codon to prevent the translational fusion of vector sequences. In this demonstration, we are including the stop codon.
3. Just like in the forward primer, The sequence was selected till the parameters like GC content, and Tm matches the desired values. It is a good practice to keep the parameters (Tm and GC content) as close as possible for forward and reverse primer (Fig 3).

Figure 3. Sequence selected for designing forward primer (text highlighted in blue that is pointed by arrowhead). The red box indicates the parameters of the selected sequence like Tm, length of the sequence, and GC%.
4. As the template sequence is from 5’ to 3’ direction, the reverse primer cannot be ordered directly. It needs to be reverse-complemented.
5. To reverse complement, copy the sequence (ctrl+c or cmd+c) and past the sequence (ctrl+v or cmd+v) in new window (Fig 4.1). There is a button in the header part of the APE to reverse complement the sequence. Select the primer sequence (if it is not selected already) and click on the button (Fig 4.2).
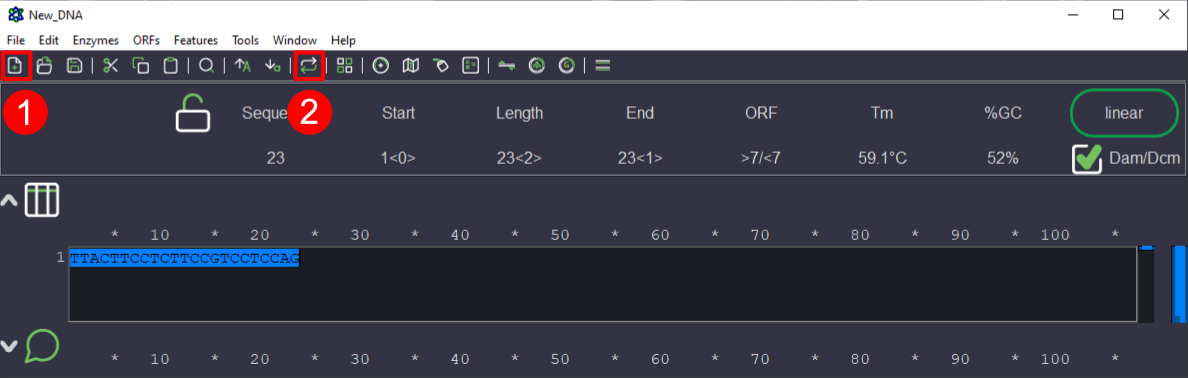
Figure 4. Image showing the steps involved in reverse complementation in APE software. 4.1 Button for creating a new file/window. 4.2 Button for reverse complementation.
6. Cross-check if the sequence has been reverse complemented or not.
7. Before reverse complementation the sequence is 5’-CTGGAGGACGGAAGAGGAAGTAA-3’ and after reverse complementation 5’-TTACTTCCTCTTCCGTCCTCCAG-3’.
8. Alternatively, you can reverse complement the sequence without copy-pasting the sequence into a new window. But we do not recommend it as it changes the original sequence in the file.
Reverse complementation explained
Double-stranded DNA runs in the 5’ to 3’ direction with the complementary base pairing of A=T and G=C. As we have shown only one strand of DNA (5’ – 3’ strand), reverse primers sequence needs to be extracted from it. As mentioned earlier, it is a general notion to represent DNA sequences. If you provide a DNA sequence to primer synthesizing company, they always assume that you have written the sequence in 5’-3’ direction and synthesizes in the same order. If you do not reverse complement the selected sequence (from the upper strand / 5′-3′ strand), you will get another forward primer that starts from the end of your gene of interest (Fig 5).
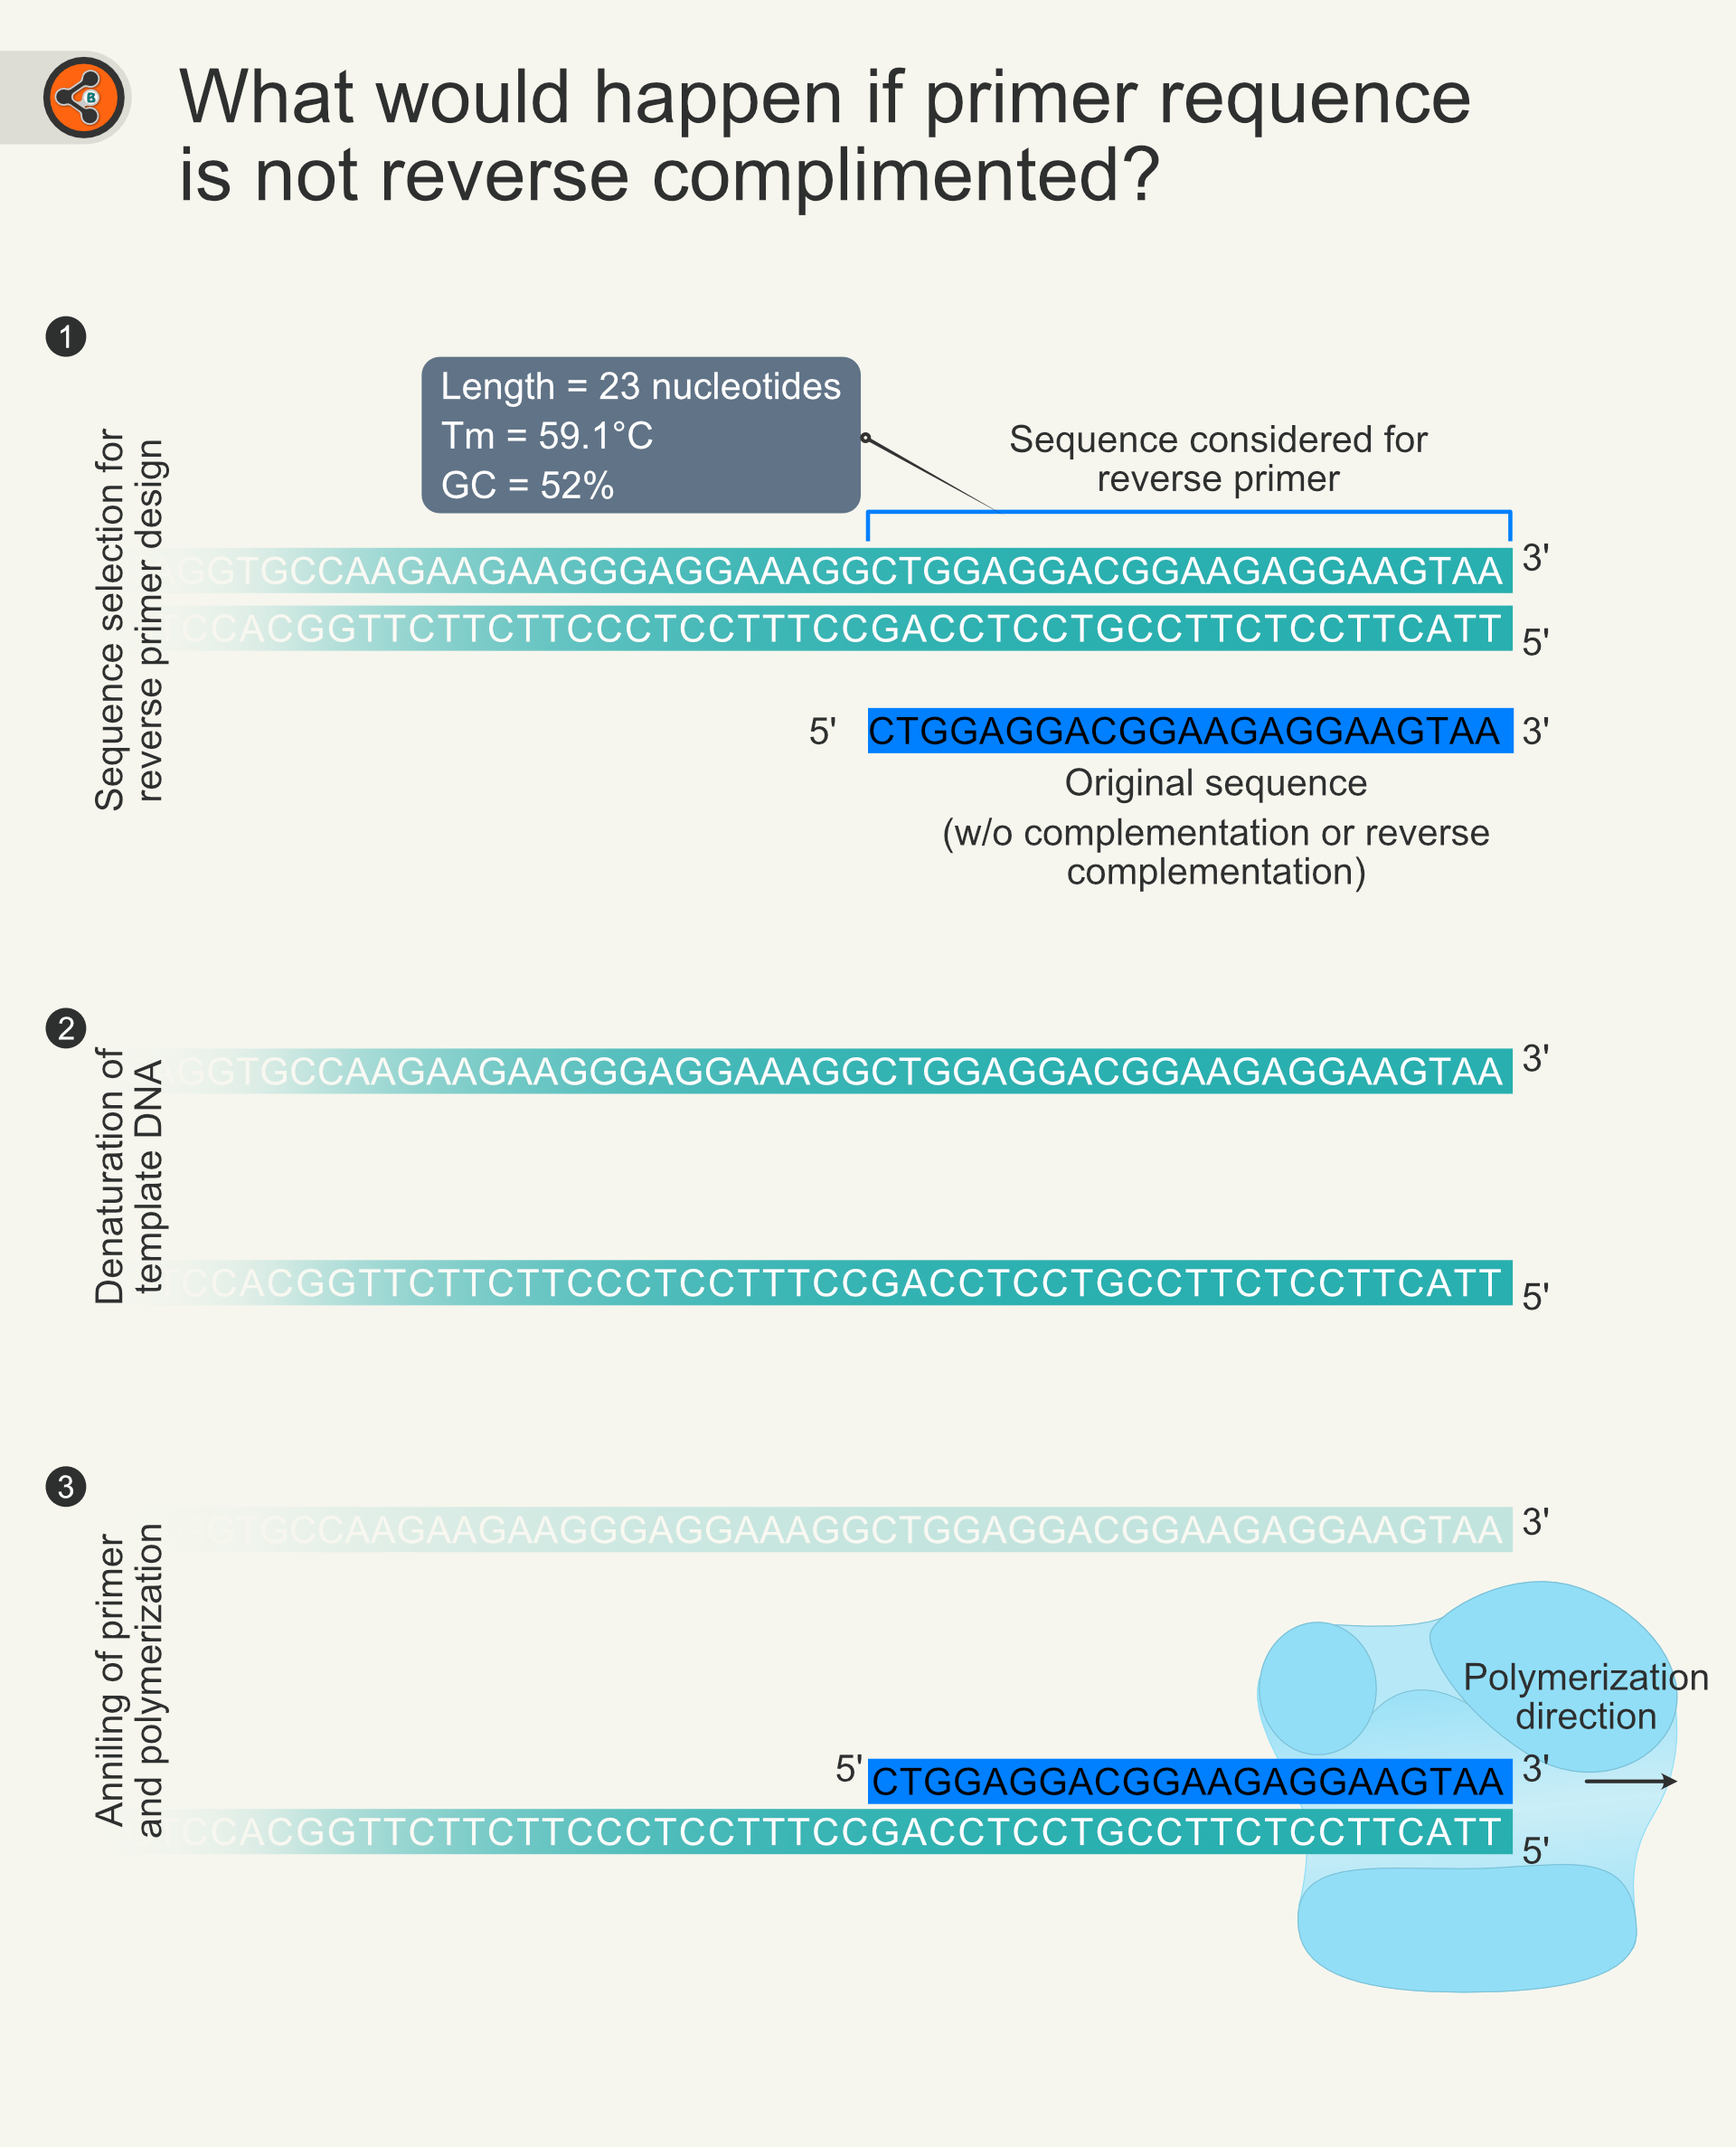
Figure 5. Illustration showing the importance of reverse complementation. 5.1 The DNA double helix is shown in teal color. The sequence covered in blue open rectangle is used for reverse primer. 5.2 DNA duplex unwinds in PCR reaction. 5.3 Binding of primer to the complementary strand and extension of the primer. polymerization results in the synthesis of the upper strand (5’-3’). This action is equivalent to the action of forward primer.
Reverse complementation has two steps.
- Complementary sequence is the sequence of opposite strand but runs in the same direction. For example, 5′-ATGC-3′ complementary sequence would be 5′-TACG-3′. Applying the same principle to the sequence selected for primer i.e., 5’-CTGGAGGACGGAAGAGGAAGTAA-3’ results in 5’-GACCTCCTGCCTTCTCCTTCATT-3’. The complementary sequence can not bind to either strands due to lack ofdirectionality or complimentality.
- So, the second step includes reversing the direction of the complementary sequence. Reversing the the directionality simply changes the 5′ into 3′ and vice versa. That makes 5′-TACG-3′ to 3′-TACG-5′. As discussed previously, DNA sequences to be written in 5′-3′ direction (as John wick says “Rules !”). So the sequence changes from 5′-TACG-3′ to 5′-GCAT-3′. Use the same principle to our complimented primer sequence would change the sequence from 5’-GACCTCCTGCCTTCTCCTTCATT-3’ to 5’-TTACTTCCTCTTCCGTCCTCCAG-3’.
The same process is represented as an illustration below (Fig 6).
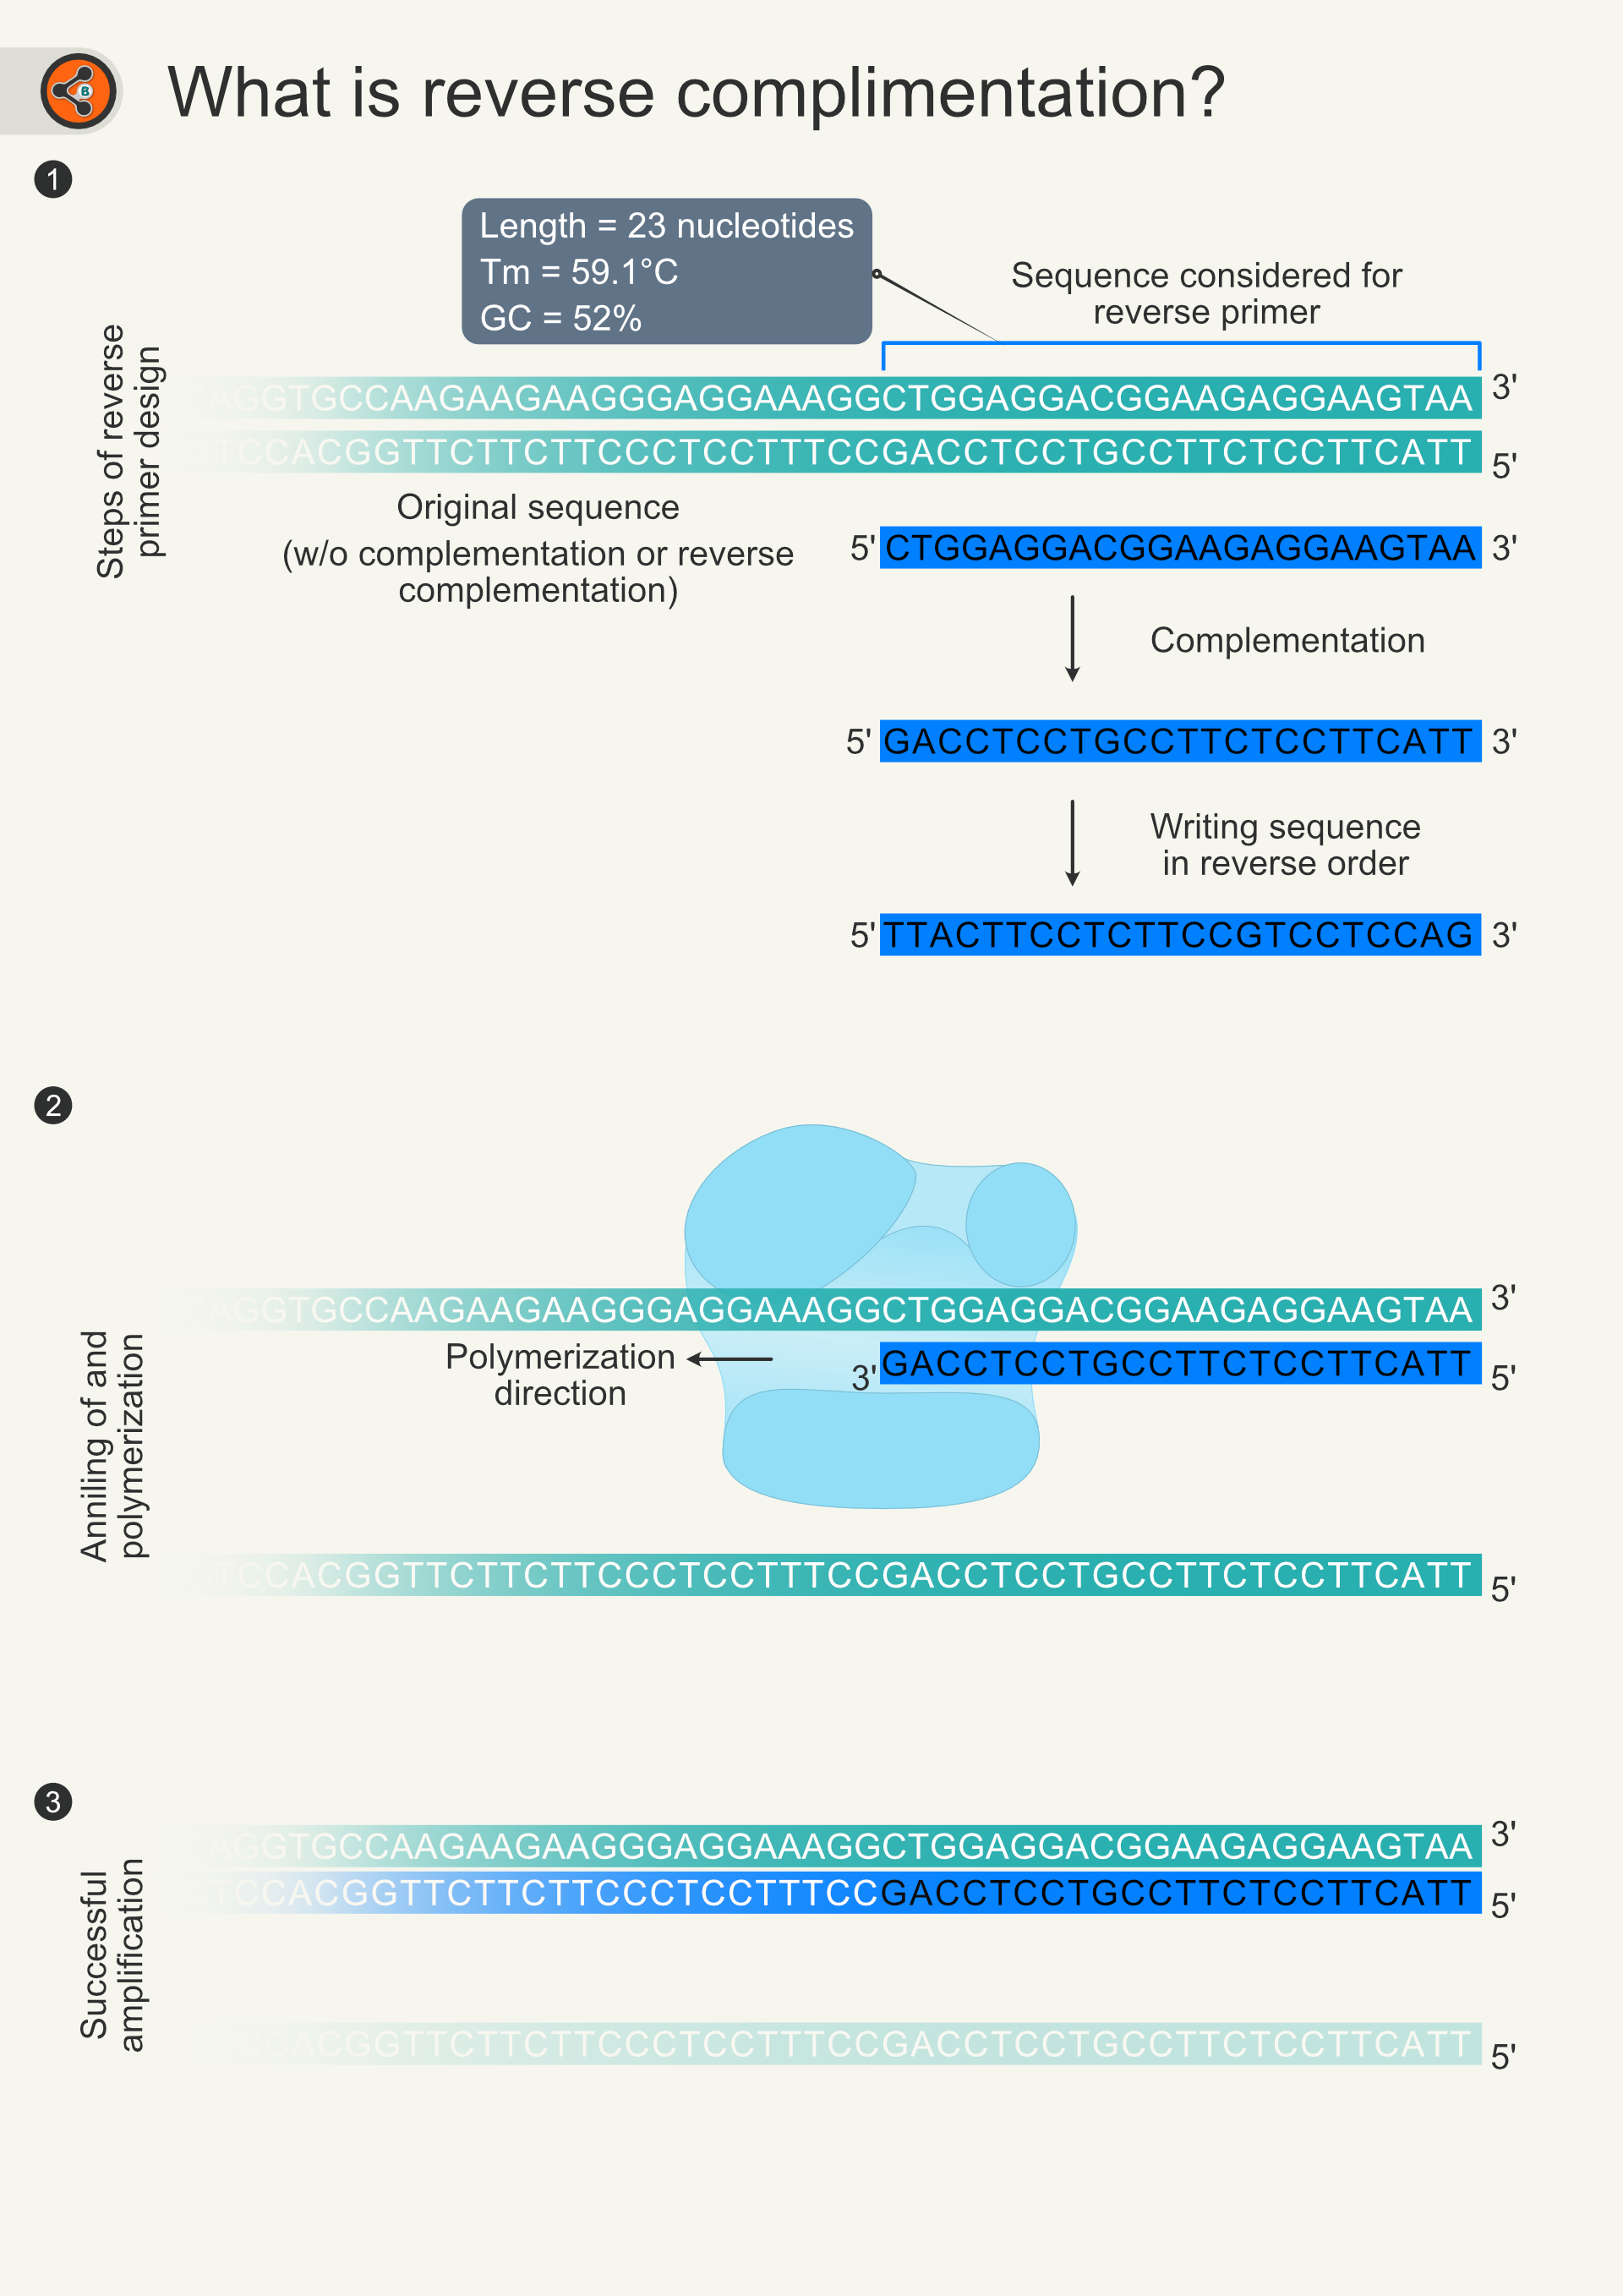
Figure 6. Illustration depicting the design of reverse primer and its involvement in PCR. 6.1 The DNA double helix is shown in teal color. The sequence covered in blue open rectangle is used for reverse primer. Blue ribbon indicates primer sequence selected for reverse primer design. reverse complementation contains two steps (Complementation and changing the direction) were shown. 6.2 DNA duplex unwinds in PCR reaction. Primer binds to the upper strand (5′-3′). Polymerization direction is into the template stand rather outward of sequence as happens without reverse complementation. 6.3 Extension of primer creating lower strand (3’-5’).
Primer designing parameters
There are certain guidelines to follow when designing a primer. Some of them were discussed earlier (Tm and GC%). Let’s see the others now.
- The primer length is usually 12 bases to 30 bases. 30 bases is not a hard rule, but indicates increse in the probability of secondary structures.
- The forward and reverse primers should not have Tm differences of more than 5 °C.
- In case if you wonder how to calculate Tm, here is the formula: 2(A+T)+4(G+C) or 2(wA+xT)+ 4(yG+zC) (w,x, y,and z are number of the corresponding nucleotide residues in the given primer sequence).
- Tm is the temperature at which half the DNA is single-stranded. At the Tm of 55- 62, primers will work better.
- The GC content of primer is to be maintained at 40-60%. The 40-60% GC content gives the stable association of primers to bind their target sequence. Because G-C has triple hydrogen-bonding between compare to A-T base-pairing which have two hydrogen bonds.
- The last primer sequence at 3’ end should end with G or C, which is known as GC clap. The triple hydrogen bond reduses the wobbling thus give more chance to the polymerase to go for extending the primer.
- The primer should not contain more than three G or C nucleotides in the last 5 nucleotides (3′) as it can bind non-specifically some where else (G-C pairing is more stable than A-T pairing).
- The primer should not contain any repetitive sequences as they can causes secondary structures, thereby inhibiting PCR reaction.
- The forward and reverse primers should not have complementary sequences. This can lead to the amplification primers which results in primer dimer. Primer dimers sequester resources that suppose to be available for the amplification of the temple DNA.
- For some sequences (promotors, 5′ & 3′ UTR sequences), getting the ideal primer parameters such as primer length, Tm, and GC content is difficult as they are AT-rich sequences. In this situation, one need to prioritize Tm.
Although we have mentioned ideal conditions to make primers, it is not always possible to control the sequence selection (amplifying gene from the start codon for example). In these cases, you need to modify the primer designing strategy or the amplification strategy.
The above mentioned primer designing demonstration works for few cloning methods such as
However, other methods would need additional sequences that aid in ligation / recombination or determining the directionality of the insert.
Primer designing for directional TOPO cloning (D-TOPO)
D-TOPO cloning offers one of the simplest modification among the methods that require modified primer sequences. D-TOPO cloning allows the cloning of insert in one particular direction rather than 50-50 chance as observed in the cloning methods mentioned above. This is achieved by a short strech of 4 nucleotides ‘CACC’ that are added to the 5′ end of the forward primer. And, no special sequence modifications (additions or deletions) to the reverse primer. The following table gives the comparison of primers designed for various cloning methods.
| Method of cloning | Forward primer | Reverse primer |
|---|---|---|
| Blunt-end cloning, Blunt-end TOPO cloning, TA cloning, and TOPO TA cloning | ATGGCATCCACACACCAATC | TTACTTCCTCTTCCGTCCTCCAG |
| Directional TOPO / D-TOPO | CACCATGGCATCCACACACCAATC | TTACTTCCTCTTCCGTCCTCCAG |